Below, I’ll explain how to start leveraging the power of autoguiding for deep sky astrophotography. Many amateur astrophotographers are hesitant to add any additional complexity to an already steep learning curve, but the truth is, autoguiding your camera and telescope isn’t overly difficult to execute.
I’ve been using a small “guide scope” with an autoguiding camera to take longer exposures through my telescope for several years. With the right equipment and a little trial and error, you’ll wonder how you ever lived without it.
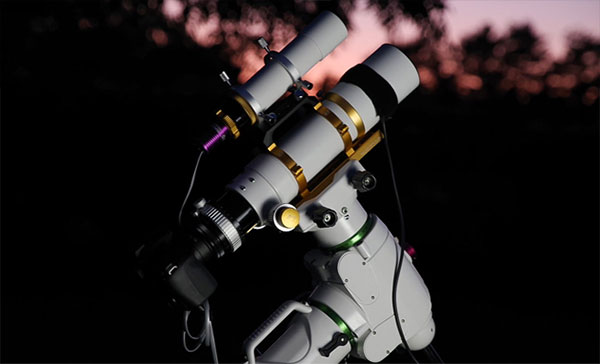
The setup above shows a William Optics Zenithstar 73 refractor with a 50mm guide scope and camera mounted on top.
Basic Autoguiding for Astrophotography Made Simple
I’ll admit that autoguiding can seem a bit daunting in the early stages of building your first deep sky astrophotography kit. The great news is, there are more compact and affordable solutions available than ever before.
Below, I’ll offer you some affordable autoguiding solutions that I have personally used to guide a number of telescope setups. They’re really not that hard to get up and running, and it can make a big difference to the quality of your images.
The Concept of Autoguiding
Whether you’re shooting with a DSLR or a dedicated astronomy camera, capturing longer exposures means that more light (or signal) can be recorded in a single shot. You’ll often reveal much more signal on a deep sky object in a 5-minute exposure than you would in 30-seconds. This makes being able to consistently capture long exposure images with sharp, focused details a real benefit for astrophotography.
However, to do this requires extreme accuracy from your telescope mount as it slowly tracks the apparent movement of the sky. Even the slightest amount of periodic error can ruin a long exposure image of your target. With so much time and money spent choosing the right camera and telescope to capture your images, it would be a shame to lose any of that precious data to something silly like a slight tracking error.
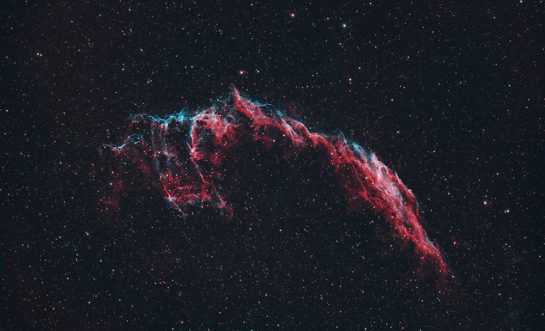
This image of the Veil Nebula was captured on an affordable equatorial mount using autoguiding
Why its Useful for Astrophotography
Modern equatorial mounts are quite capable or compensating for the rotation of the Earth, that is what they were designed for. However, deep sky astrophotography (especially at longer focal lengths) is a very demanding application for any entry-level to intermediate equatorial mount.
Depending on which telescope mount you’re using, subtle errors in the accuracy of your polar alignment can begin to surface in images as short as 60-seconds. The slightest bit of off-balance in your imaging payload can put stress on the gears in your mount, which often leads to less than perfect stars in your long exposure image.
The QHY PoleMaster device is great for those looking to easily improve their polar alignment accuracy. Be sure to check out my full review of this electronic polar scope.
Even with your polar alignment spot-on, and your payload perfectly balanced, autoguiding is often necessary to track your object smoothly enough for astrophotography. This is especially true on beginner level GoTo mounts such as the Sky-Watcher HEQ5 Pro pictured below.
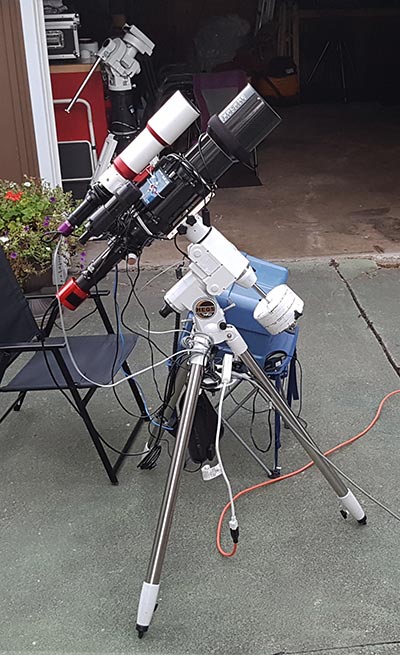
My Sky-Watcher HEQ5 Pro mount with a refractor guide scope mounted to the primary imaging telescope
The mount itself may have shortcomings due to worn out gears or low-cost materials used in its construction. There are a myriad of potential culprits for periodic error in your mounts tracking ability. Have a look at the list of upgrades applied to a “hypertuned” Celestron CG-5 mount. It’s a great general list of reasons why your mount may not be tracking accurately.
- Complete inspection of the mount head.
- Complete dismantling of the mount head.
- Inspection and cleaning of each part – removing all metal burrs, shavings, thick grease and foreign objects.
- High-resolution sanding and polishing of moving internal parts resulting in high smoothness of internal metal parts and “glide like” performance from your mount.
- Inspection and adjustment of motors and encoders with gear set screws replaced as necessary.
- Replacement of stock worm bearings with ceramic hybrid bearings.
- Replacement of plastic bearings with PTFE bearings.
- Reassembly using high-grade synthetic grease.
- Resetting of worm gear meshing.
- Adjustment of backlash settings in RA and DEC.
If the issues are severe enough, even autoguiding won’t help. For this reason, its always best to invest in a quality telescope mount that has been proven to be a reliable choice for deep sky astrophotography.

Thankfully, basic autoguiding is enough to correct most of the issues associated with modern equatorial mounts. The use of autoguiding made a dramatic difference to the types of images I was able to capture on my old Celestron CG-5, (Now the Celestron Advanced VX).
What I’m Using
I am currently using various autoguiding systems on my Sky-Watcher HEQ5, and Sky-Watcher EQ6-R Pro. I’ve also tested a Celestron CGX-L equatorial mount, which can carry an impressive 75-pound payload.
I have used a number of different autoguiding telescopes from the Orion 50mm Mini Guide Scope to a William Optics 72 APO Doublet. In my experience, the size and focal length of the guide scope you use makes no difference in the guiding accuracy you’re able to obtain.
In the following video, you’ll see me use autoguiding to collect 3-minute long exposures on the Cocoon Nebula, using a DSLR camera and 73mm telescope. When using a DSLR camera for deep sky astrophotography, autoguiding not only allows you to shoot longer but dithering (which helps reduce noise in your stacked image) is now possible.
Here is a complete list of guide scopes I have used in the past:
- Orion 50mm Mini Guide Scope
- Starwave 50mm Guide Scope
- Starfield 50mm Guide Scope
- Starwave 60mm Guide Scope
- Starfield 60mm Guide Scope
- William Optics Z72 APO Doublet
These days, I primarily use the Starfield 50mm guide scope package because it is just so lightweight and easy to mount to various telescopes. Below you’ll see it mounted to an iOptron Photron Ritchey-Cretien telescope.
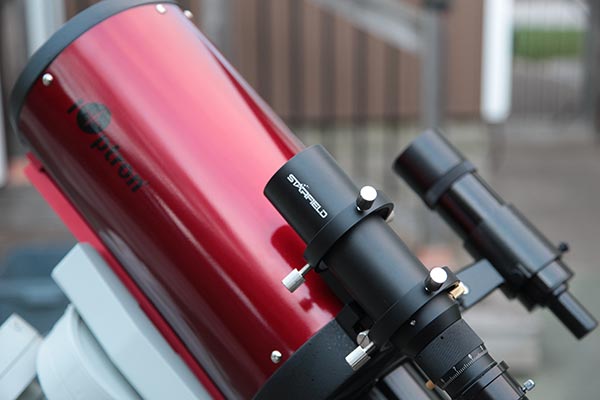
The Starfield 50mm Guide Scope package mounted to an RC6
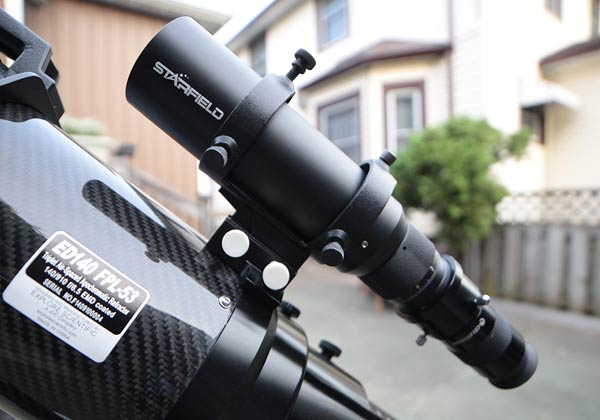
The Starfield 50mm guide scope package includes the Altair GPCAM2 mono guide camera, and its the autoguiding system I recommend for those looking to get started. You may have also noticed this autoguiding package in action on the much heavier Explore Scientific ED140 refractor.
This little black telescope has a focal ratio fo F/3.4 and a handy helical focuser that holds a tight focus throughout the night. The universal dovetail plate fits Celestron, Sky-Watcher, Vixen & GSO saddles. For the Explore Scientific telescopes, I simply fit the tube into the existing finderscope rings.
The camera I use most often with the 50mm guide scope is the ZWO ASI 290mm mini. This is not only a highly sensitive monochrome guide camera, but it’s also compatible with the ZWO ASIair wifi camera control device and software. The ASIair has its own autoguiding program in the application that communicates with the telescope mount just like PHD2 does.
What you need to start Autoguiding
The basic equipment needed to accomplish a successful night of astrophotography with autoguiding is a secondary telescope (guide scope) and a guide camera. The guide scope rides atop your primary imaging telescope and is usually much smaller. The autoguiding camera is traditionally lighter than your primary imaging camera, and will often include a small mono CCD or CMOS sensor.
Once properly connected to your computer using the appropriate cable (in my case, a USB 2.0 A-male to B-male cable), the autoguiding camera will broadcast a live-loop image through the guide scope to your computer.
How it works
The main objective of your autoguiding system is to focus and lock onto a star in the guide telescope’s field of view. The camera will continuously capture short exposures through the guide scope, usually anywhere between 1 and 3-seconds in length.
The guide camera and your telescope mount communicate with each other to maintain a lock on your target by making subtle corrections to the tracking. This is accomplished by using a great piece of free software developed by Stark Labs.
PHD2 Guiding
By using an autoguiding software such as PHD2 Guiding, our computer can communicate with the telescope mount. PHD2 Guiding is the successor to PHD Guiding, which I used for several years before upgrading to PHD2. PHD stands for “Push Here Dummy”, and it very easy to use, once everything is set up properly.
This software can also do other useful astrophotography tasks such as drift alignment, which is helpful for those who cannot use Polaris for Polar Alignment.
In early 2017, I upgraded my autoguiding system to include a more sensitive camera, and an improved guide scope:
PHD2 Guiding includes a user interface that allows you to enter in your specific connection type and autoguiding camera model. Currently, I use an Altair GPCAM2 (AR01030 Mono) guide camera with a Starfield 50mm guide scope. This combination works extremely well, and I spend very little time dealing with anything related to autoguiding these days.
Credit goes to Trevor Jones from AstroBackYard for this article.
