For centuries, the quality of a telescope has depended on one crucial component: the mirror. A well-made mirror determines how much light you can gather and how sharp the universe looks through the eyepiece. Over time, however, even the best mirrors lose their shine. Dust, moisture, and oxidation slowly rob them of their reflectivity.
While most modern mirrors are coated with aluminum in specialized vacuum chambers, a growing number of amateur astronomers are rediscovering an older, more hands-on solution: DIY mirror resilvering.
Why Silvering Beats Aluminizing
Most commercial mirrors today are aluminized — a process done in vacuum chambers with specialized equipment. While effective, aluminizing is expensive, inconvenient, and difficult for amateurs to attempt on their own.
Aluminum coatings became popular in the 20th century because they were durable and easy for labs to apply. But silver has always had one huge advantage: it’s more reflective in the visible spectrum. Where aluminum reflects around 85–90% of visible light, silver can reflect up to 95–98%. That extra reflectivity translates into brighter, crisper images of stars, galaxies, and nebulae.
The drawback? Silver tarnishes. For decades, this meant frequent recoating or expensive professional work. Today, with modern silvering kits and polishing compounds, amateur astronomers can resilver their own mirrors at home or in a workshop—making silver once again a practical, high-performance option.
How the Process Works
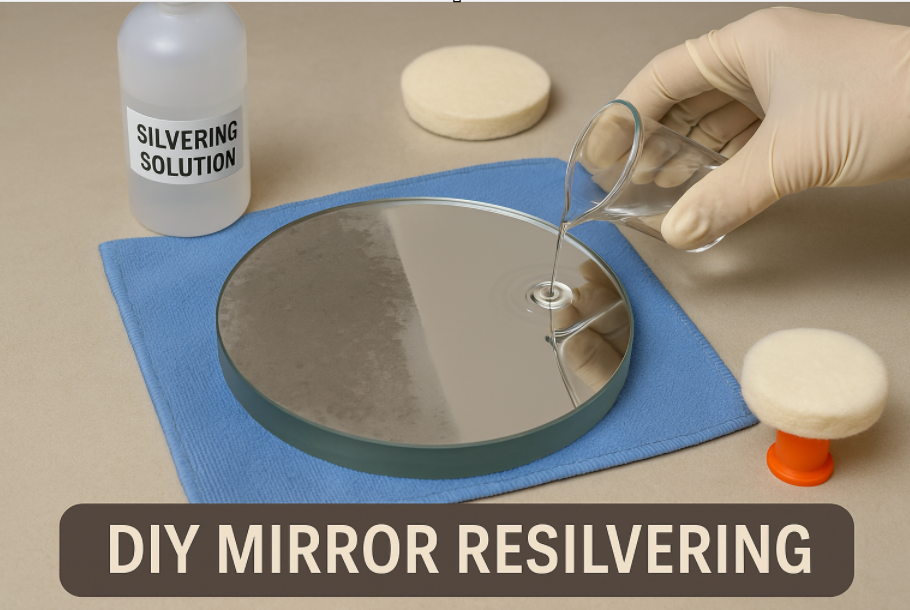
Materials
From the Mini Silver Kit (SKU A1204D)
- Tin for Silver, Concentrate, 60 mL
- Silver Solutions (Silver, Activated Silver, Silver Reducer)
- Cleaner Concentrate Powder
- Mirror Remover, 125 mL
- Black Mirror-Backing Paint, ½ pint
- Measuring Cylinder (10 mL)
- Measuring Cups (16 fl oz, three × 1 fl oz)
Additional Items
- Angel Guard, 250 mL (SKU A2156A) – protective overcoat
- Maple Felt Polisher (SKU A3001) – for glass pre-polish
- Cerium Oxide Powder (4 oz) – for slurry polish
- Spray bottles (3 × 8 oz) – rinsing + Angel Guard application
- Distilled water – at least 5 gallons
- Cotton balls (200 ct)
- Microfiber cloths (2 ct) – edge/back drying only
- Dish soap (phosphate-free, unscented) – e.g., Dreft
- 91% Isopropyl Alcohol – final rinse
- Baking soda – neutralizing waste
- Timer/clock with second hand
- Foam roller or disposable brush – for backing paint
- Safety: nitrile gloves, chemical-resistant gloves, goggles, respirator
 Runbook Steps
Phase 1 – Prep & Cleaning
- Cover your work area with newspaper/plastic. Place a large tray or basin to catch liquids.
- Wear nitrile gloves, safety goggles, and respirator if indoors.
- If the mirror has an old coating:
- Use Mirror Remover on a cotton ball/Q-tip.
- Wait until the coating dissolves, then rinse thoroughly with distilled water.
- Neutralize waste with baking soda before disposal.
- Degrease glass with warm water + dish soap + sponge. Rinse well.
- Use kit Cleaner Powder with damp cotton balls, light pressure, to polish surface.
- Rinse thoroughly with distilled water. Do not let glass dry.
 Phase 1a – Optional Cerium Oxide Pre-Polish
Use only if you want maximum adhesion or if the water-break test fails after cleaning.
- Slurry: Mix 1 teaspoon cerium oxide in 1 cup (~250 mL) distilled water. Should look like milk.
- Pad: Wet the Maple Felt Polisher, damp (not dripping).
- Polish: Apply slurry to glass; use overlapping circles/figure-8 strokes.
- Pressure: Light, ~1–2 lb hand pressure.
- Time: 2–4 minutes total for a 12″ mirror.
- Keep wet: Never let slurry dry.
- Rinse: Flush thoroughly with distilled water until perfectly clear.
- Check: Perform a water-break test (tilt glass ~60°). Water should sheet evenly with no beads.
- If it fails: repeat kit cleaner powder step, not more cerium.
 Cerium oxide is only for bare glass before tinning. Never use on fresh silver.
Phase 2 – Sensitizing (Tin)
- Dilute Tin for Silver: 2 mL per sq ft (~12–15 mL for 12″) in the 16 oz cup + 1 oz distilled water per mL tin.
- Pour over the glass.
- Let dwell for 30 seconds.
- Rinse thoroughly with distilled water. Do not dry.
Phase 3 – Silver Deposition
- Measure 15 mL each of Silver Solution, Activated Silver, and Silver Reducer per sq ft (for 12″ mirror ≈ 36 mL each).
- Mix them by pouring back and forth into fresh cups.
- Pour onto glass, gently rocking to cover evenly.
- Let silver form for ~5 minutes, rocking occasionally.
- When bright and even, pour off into waste tray.
- Rinse thoroughly with distilled water.
Phase 4 – Protective Overcoat (Angel Guard)
- Shake Angel Guard well, transfer to a clean spray bottle.
- Spray evenly to fully wet silvered surface.
- Let dwell 5–10 minutes.
- Rinse thoroughly with distilled water (several times – Angel Guard is hydrophobic).
- Dry with clean, oil-free air or allow to air dry. Do not allow puddles to dry in place.
Phase 5 – Backing & Curing
- Once silver + Angel Guard are fully dry, apply Black Backing Paint (foam roller or brush).
- Allow to cure completely.
- Optionally clean front face gently with Mirror Remover if haze remains (no rubbing).
Phase 6 – Reassembly & Storage
- Handle only with cotton gloves.
- Mount mirror with foam/felt edge pads.
- Store scope capped. For long-term storage, place in a sealed bin with silica gel + anti-tarnish strips.
 Safety Checklist
- Always use gloves and goggles; wear respirator during silvering and Angel Guard use.
- Neutralize all waste with baking soda before disposal.
- Silver stains permanently — keep away from clothing and surfaces you care about.
- Work in a ventilated space or outdoors if possible.
While modern kits make resilvering accessible, it’s not without risks.
- Not a Professional Guarantee: DIY coatings may not last as long as professional aluminizing. Results vary depending on skill and care.
- Maintenance Needed: Silver mirrors like all mirrors will eventually tarnish. Silver tarnishes twice as fast as aluminum but with proper storage, varnish coating, and occasional touch-ups, however, they can remain brilliant for years.
A Revival of an Old Art
DIY mirror resilvering represents a revival of the telescope-making spirit that drove amateur astronomy for centuries. It’s not just about restoring a mirror—it’s about reconnecting with the craft, science, and wonder that come from shaping the tools we use to explore the sky.
As one astronomer put it: “When you resilver a mirror yourself, you’re not just repairing glass. You’re taking part in the same tradition that Galileo, Herschel, and the great mirror makers of history lived through—making the universe your own.”
👉 If you’re interested in learning more, GHAAS.org will be posting guides, resources, and member experiences with resilvering in the months ahead.